All posts by Seseorang

Best Golem Deck

Hey guys it’s me and today I’m going to share one of the best Golem decks in the game. Now obviously whenever you tell someone that a certain deck is the best, they’re going to be highly skeptical. So I’m going to tell you guys exactly why this one of the best Golem decks in the game and show you guys some really good high level live action with this deck in the video.

So first, to create the best Golem, you deck must be able to do the following:

  1. It must have an Average Elixir Cost that’s below 4.5. The Golem is an 8 Elixir-costing card, so it’s not a good idea to use many other expensive cards as you’re going to have a difficult time deploying them and countering your opponent.
  2. It must have counters to all of the biggest threats to the Golem.
  3. And the deck must work with the Golem. The Golem is the best tank in the game, so he’s best utilized with ranged attackers.

So with those three key fundamentals in mind, I’ve created one of the best Golem decks in the game. The average elixir cost of this deck is 4.3, which meets the first criteria. The second criteria is that the deck must be able to counter all the biggest threats posed to the Golem. There are five main threats to the Golem, the Minion Horde, Barbarians, Inferno Tower, Mini P.E.K.K.A and Epic P.E.K.K.A. So I need to surround my Golem with cards that can help counter all of these big threats. And so, I chose the best cards that can allow me to remove more than one of these threats.

For example, I have the Wizard card to defeat the Minion Horde and Barbarians. So imagine I have the Golem going after my opponent’s Crown Tower, with a Wizard behind, my opponent won’t be able to stop my Golem with a Minion Horde or Barbarians. Two other great splash attackers who can target both ground and air other than the Wizard are the Baby and Witch. However, both the Baby Dragon and Witch are much weaker than the Wizard and struggle to defeat a Minion Horde or Barbarian quickly, so the best option is the Wizard.

The Best Cards and The Worst Cards in Clash Royale

Hey guys it’s Ash and in this post I’m going tell you guys the best cards in the game to spend your gold on, the epic cards to get, and the worst cards that you should probably ignore. Keep in mind that these are my opinions based on my experiences and also stats from the most popularly used cards among the top players in the game. I’ve been playing this game since day 1 of soft launch and have kept track of all the trends, the nerfs and buffs of cards, and the cards that always seem to be the most popular and effective. So that’s what I’m gonna share today. Help you focus on the cards that will help you in the long run, in the higher arenas as you progress. So first I’m gonna start with 10 best common or rare cards that you should focus on getting, upgrading, and requesting for in your clan.

The best Cards to Upgrade and the Worst Cards to Ignore

10 Best Common and Rare Cards

Best common and rare cards

  1. Arrows – Arrows have always been among the most popularly used cards in the game and in all levels of play. This is a very high value card as it only costs 3 Elixir and can almost always provide you with an Elixir advantage by using it properly. It has a very large radius, allowing you to deal damage to multiple troops at once. Imagine using the Arrow card on a Minion Horde and Spear Goblins, that will instantly give you a 4 Elixir profit. So it’s no surprise that the Arrow card is among one of the most popular cards in the game.
  2. Barbarians – The Barbarians card had always been a popular card and a very good card as well. For the price of just 5 Elixir, you’re able to summon 4 powerful Barbarians. To demonstrate their power together, one level 8 Barbarian has 579 HP and 96 DPS. So 4 of them together is a total of 2316 HP and 384 DPS, no other card in the game gives you this much value. Now what makes Barbarians is not that offensive potential, but how good of a defense they are. They are able to defeat some of the most powerful offensive combinations in the game, which includes the Hog Rider, Prince, Pekka, Goblem, Giant Skeleton, and so on. So again it’s really not a surprise why you see Barbarians so commonly used on TV Royale all the time.
  3. Hog Rider – The Hog Rider is undoubtedly the best offensive card in the game. He has very decent HP, he’s very fast, powerful, and can go straight for your Arena Tower. Making him a very annoying card to stop when you don’t have multiple buildings. Not only that, the most frightening aspect of the Hog Rider, in my opinion, is that he only costs 4 Elixir! So he can have a detrimental effect in a game when you’ve taken a small Elixir lead.
  4. Spear Goblins – Spear Goblins are among the cheapest cards in the game and come with a high return value. It can be the first card you play without spending so much Elixir to scout your opponent. Three Spear Goblins together also make for a strong air-targeting combo behind a tank such as a Giant or Golem. They are an excellent way to make profit with Elixir. By simply using them on defense with your Arena Tower, you can make a big profit in Elixir. For example, say your opponent sends in a Mini Pekka, you can simply use your Spear Goblins to deal damage and distract and along with your Arena Tower also helping out on defense, you can quickly kill the Mini Pekka and take a 2 Elixir lead. Or you can even allow your opponent’s Baby Dragon to target your Arena Tower, but place your Spear Goblins on the side to quickly kill the Baby Dragon. This way, you lose a few HP on your Arena Tower, but you obtain a 2 Elixir profit and still have all your Spear Goblins at full health. So yea, this is a card made for winning.
  5. Archers – Similar to Spear Goblins, but cost 1 more Elixir. However, their cost is granted by the fact that they are more superior. They do more damage and have much greater HP. For example, level 8 Spear Goblins have 100 HP, while level 8 Archers have 241. Spear Goblins get one-shotted by Arrows, Baby Dragon, Wizard, Zap, and many other cards, but the Archers do not and that’s what makes the Archers special. However, at high level play, the Archers become quickly outclassed by the Princess card.
  6. Goblins – Goblins are also among one of the best cards in the game because of how cheap they are, only 2 Elixir! While they do insane damage together. For example, three level 8 Goblins together do 261 damage per second, which makes them an excellent defense. With just a 2 Elixir cost, you can quickly obtain a big Elixir profit. You will very commonly see Goblins and Spear Goblins used among the best players in the game.
  7. Wizard – The Wizard is among one of the best cards in the game because of what he can do. He has very decent DPS and what makes him special is the fact that he does splash damage. He’s an excellent card to beating hut spammers and some of the most commonly used cards in the game, such as Barbarians and Minion Horde. The only other splash attacking cards that can target air troops are the Baby Dragon and Witch. However, both the Baby Dragon and Witch card are much weaker than the Wizard, so they struggle to beat a card such as the Minion Horde on time. And so, that’s what makes the Wizard such a good and important card. It basically outclasses the Musketeer because of its ability to do splash damage.
  8. Fireball – The Fireball card is another excellent card for winners. People often misuse this card and use it for targeting Arena Towers. What makes the Fireball one of the best cards in the game is its high potential of getting a great Elixir profit. This card is meant to be used as a defensive stopper. It’s best used against a clumped group of troops. For example, the Fireball is an excellent counter against the very common Barbarian card. Since it costs 4 Elixir, using a Fireball on Barbarians at any time is always a good idea. However, it’s even a better idea to wait and use the Fireball on the Barbarians and the support troops behind him to maximize your profit. For example, if someone uses Barbarians, they’re going to most likely couple the Barbarians with another troop such as ranged attacker. So what you should is wait until the Barbarians have it to your side and see if your opponent couples the Barbarians with another troop, and then you drop your Fireball onto all of them. The main challenge of the Fireball is to accurately time and drop it, something you will learn to master with experience.
  9. Minion Horde – Like the Barbarians, the Minion Horde is another monstrous card on both defense and offense. It is a very commonly use card because of just how many powerful cards that it quickly counter. The Minion Horde is definitely one of the best defense in the game. However, unlike Barbarians, the Minion Horde can be one-shotted by Arrows. But it’s fast card and often can counter a big threat before your opponent can even play the Arrow card.
  10. Tesla – The Tesla is one of the most powerful defenses in the game and only costs 4 Elixir. Not only that, it can avoid area damage spell cards by hiding underground. Although to make the game more fast paced, Supercell decided to nerf all defensive buildings in coherence to their “offense over defense” philosophy. However, the Tesla still remains as possibly the best defensive building in the game.

Now if you guys are wondering what the best Epic cards are to get and work on, then I’m going to give you guys my top 5.

5 Best Epic Cards

Best Clash Royale Epic Cards

  1. Baby Dragon – The Baby Dragon would be my pick as the most versatile and useful Epic card in the game. Definitely not the most powerful card, but it can fit in almost any deck. It’s bulky, so you can use your ranged attackers behind it. It does splash damage and can target both ground and air troops, which is very important for defeating hordes and hut spammers. The other two troops that can do splash damage and target air are the Wizard and Witch, but what makes the Baby Dragon a more appealing option is that it costs only 4 Elixir while the Witch and Wizard cost 5. And the Baby Dragon is much bulkier, and not weak to Fireball.
  2. Prince – Along with the Hog Rider, the Prince is also one of the best offensive cards in the game because of power and speed and his ability to deal double the damage when charging. Not only that, he is very versatile because of his very decent HP. Which means that you can use him on defense as well and couple him with ranged attackers.
  3. Dark Prince – Like his brother, the Dark Prince is also one of the best offensive cards in the game. The Prince is weak to hordes of low HP troops, but the Dark Prince isn’t, he can deal splash damage and kill them all at once. However, he isn’t as powerful as the Prince, but his ability to deal splash damage is very important. His bulkiness also makes him a very versatile card for defense. Not to mention, he only costs 4 Elixir, which is 1 less than his brother.
  4. Golem – The Golem is definitely one of the best cards in the game. Unfortunately, the Golem is also one of the most expensive cards, costing 8 Elixir to use. But that’s warranted because of his very high HP, death damage, and ability to generate Golemites after his death. All this just makes him one of the best Epics.
  5. Poison Spell – The Poison Spell is a dangerous defensive card that not only slowly kills its foes, but also slows their speed. Best of all, it only costs 4 Elixir, which is very worth it when used against low HP troops and slowing down the bulkier troops and win those Elixir tradeoffs. Remember, your Arena Tower also helps out on defense, with a combination of Poison and your Arena Tower, you can win big Elixir tradeoffs on defense, making the Poison Spell a very dangerous card.

So those are my top 5 Epic cards. Now lastly, I’m going to tell you guys the 5 worst cards in the game, that you should probably ignore.

How to Spend Gems in Clash Royale

Hello guys, do you know how to spend Gems properly in Clash Royale? Let’s talk about this topic today. I have received loads of questions about this lately. I hope this guide is good enough to satisfy you. Also, I want to give a big thanks to The Rum Ham for helping me finish this guide (he is the top 1 player in game right now).

How should I spend Gems in Clash Royale?

At first, let’s take a look at our Chests, which can be found or buy in Clash Royale:

Name Unlocking time Gem Timer Description
Silver Chest 3 Hours 18 Gems Fewest Cards, most common. You can get Rare, Epic or even Legendary Cards but they are extremely rare.
Golden Chest 8 Hours 48 Gems Pretty popular, you can usually get 1 after every 5 wins. You can always obtain Rare Cards from Golden Chest. Epic and Legendary Cards are pretty rare. The Crown Chest is most likely the same as the Golden Chest
Giant Chest 12 Hours 72 Gems The Giant Chest is a overstuffed version of the Golden Chest. You will obtain a lot of common cards, a few Rare Cards and a small chance of Epic/Legendary Cards.
Magical Chest 12 Hours 72 Gems You can get a few Epic and Legendary Cards from Magical Chest. How sweet!
Super Magical Chest 24 Hours 144 Gems Tons of Common and Rare Cards, couples of Epic Cards, a few Legendary Cards!

I don’t want to buy any Gem!

If you don’t want to purchase any Gem and want to be Free-to-play in Clash Royale.

Your goal in game should be getting level 3 Epic Cards, level 6 Rare Cards and level 8 Common Cards, along with getting to Arena 7 to unlock all Cards. This is very attainable for free-to-play players. In order to do that, you should:

  • You are not going to make regular purchases because this is free-to-play. Save your Gems religiously and use them for 1-2 game-changing buys in the future.
  • Use 500 Gems to purchase 10,000 Gold. You can save up to 100 Gems over the 1,000 Gold Bundle by doing this. Use Gold to upgrade your Cards, soon, you will find it extremely hard to have enough Gold in your progression.
  • Don’t forget to visit Shop daily, spend your Gold to purchase a few Rare Cards everyday as the first ones are very cheap, you can even donate them and make profit. You can purchase the Epic card If you are really looking for it.
  • Just focus on only one Epic card you really want. Buy it 6 times and you can get it to level 3. That is 2,000 x 6 = 12,o00 Gold.

Buying Big Chests are very inefficient because you are not guaranteed to get what you want. Also, after that, you may even don’t have enough Gold to upgrade the cards you opened.

I can sometimes buy Gems

  • A single purchase of Gems can last for weeks or even months before you are out of Gems.
  • After purchasing Gems, you should immediately buy a bundle of Gold (either 10,000 Gold or 100,000 Gold). Just save the rest of your Gems.
  • Use Gems to open Chests when you are full of Chests.

The most common complaint I have seen so far in Clash Royale is players feel blocked they the chest row is totally full. 1 Gem in Clash Royale is roughly a penny so you are paying a quarter to open every Silver Chest. It’s better than opening Chests in shop. Opening Chests when your Chest row is full is much cheaper (it’s 50% discount on Chests). You need to spend 80-120 Gems to buy Golden Chests in the Shop but you just need to spen 48 Gems to speed up the timer. At Arena 8, speeding up the Magical Chest just costs 72 Gems, that’s over 90% cheaper than buying in the Shop.

If you want to optimize this a bit, open the Silver Chests during the day and save Gold, Giant or Magical Chests for overnights as you can get better discount for better Chests.

When Should I Buy Chests in the Shop?

Although buying Chests in the Shop is very inefficient but it’s the fastest way to level you up and get all the cards in game.

You can reach level 5 in approximately a week of play and you can learn how to properly play the game during this time. Immediately rushing to high level is not good at all. These are the estimates of cost I did in case you want to level up asap (assuming that you can earn a few Gold everyday from the free Chests)

  • Level 5 to 6: $25 ($25 total, F2P takes 2 Weeks)
  • Level 6 to 7: $50 ($75 total, F2P takes 1 Month)
  • Level 7 to 8: $150 ($225 total, F2P takes 2 Months)
  • Level 8 to 9: $250 ($475 total, F2P takes 4 Months)
  • Level 9 to 10: $500 ($975 total, F2P takes 8 Months)
  • Level 10 to 11: $1000 ($2000 total, F2P takes 16 Months)
  • Level 11 to 12: $2000 ($4000+ total, F2P takes 32 Months)

When should I buy Cards in the Shop?

Although it depends on your Gold but first 3 Common Cards, first 2 Rare Cards and the first Epic Cards are definitely worth the money. If you have purchased 100,000 Gold with Gems, getting the 2nd Epic Card for 3,600 Gold is also pretty worth it. It’s much better than waiting for the next time you see it in the Shop (about 1 month). Sometimes, I buy Rare Cards up to 150 Gold If it’s a good card and Common Cards up to 20 Gold If I really want to upgrade it.

Clan Donations?

Just donate whenever you can. You need Gold and XP more than Cards. I did write about this before, you can earn up to 4200 Gold every week If your Clan is active.

Okay so that’s it. I hope you enjoyed this guide. Please share it with your friends and Clan mates If you found this guide helpful, that will help this blog a lot as Clash Royale is just released in Global today!

Basic Guide to Attacking and Deploying

Hello guys, It’s Ash! Nice to see you guys again in this new post! Today, I am going to give you my own advice of attacking and deploying fundamentals in Clash Royale. I hope you guys will like it!

Clash Royale Basic Guide Part I

When starting your battle, you should first allow your Elixir bar to fill

You should not recklessly deploy your cards without first loading up on a full Elixir bar as this will only give your opponent the advantage. For example, say you deploy your Prince card when battle just started and you have 6 Elixir. Your opponent can simply place a Tombstone, which costs 2 less Elixir and quickly counter your Prince and take a 2 Elixir lead. Another example is playing a defense such as the Inferno Tower right away. This is a bad idea as your opponent can just wait a few seconds to load up on full Elixir, plan out a good counter, and also weaken your Inferno Tower without even touching it because of the Inferno Tower’s 40 second lifetime. Thus, it is important to first allow your bar to load up.

Usually, you will face opponents who will also wait to deploy until they have a full Elixir bar. In this case, you have two options:

  1. Deploy your card first – If you reach 10 Elixir and deploy you deploy your card first, then you will be given a greater Elixir lead for every second your opponent remains at full Elixir.
  2. Deploy your card second – If you reach 10 Elixir and decide to wait and deploy your card right after your opponent to play a better counter, then that will give your opponent an extra 1 Elixir lead.

​Usually, it is best to deploy your first card at the moment or right before you have a full Elixir bar.

When starting your battle, it is often a good idea to start with a low Elixir cost card

Start slow. I have stated in this guide numerous times that you should start your battle with a slow tempo, and this is a key fundamental to winning.

For example, say you have the Prince and Archer card in your starting hand. Do you start with the Archers or your Prince? It is often better to start with the Archers due to their significantly less Elixir cost (3 Elixir compared to Prince’s 5 Elixir cost). Why is this important? This is important as starting with a high Elixir-costing card is often dangerous. If your opponent simply places a Tombstone card (3 Elixir cost), then you are quickly in losing the Elixir race by 2. While playing a low Elixir-costing card such as the Archer comes with less risk of that and will also allow you to scout your opponent’s first move without having to waste Elixir on a full bar. If your opponent decides to send out his Giant and Musketeer at the same time, then you are prepared to make a good counter with the 7 remaining Elixir. While if you had deployed your Prince, then the Giant + Musketeer combination will quickly take out your Prince.

A good idea is to load up on Elixir to create a stronger combination of cards is to deploy your troop card at the very end of the battlefield (behind your Towers)

As your troop(s) take a longer time to travel to the opposite side, you allow yourself to load up on greater Elixir. Thus, if you wish to create a deadly combination such as a Giant + Musketeer + Witch, then this requires 14 Elixir to do so. To accomplish this, you can place your Giant at the far end behind one of your Towers and by the time he travels to the crossing bridge, you will have the additional 9 Elixir to complete your combination.

Which Arena Tower should I attack first?

When starting your battle, you may choose to attack either of your opponent’s Arena Towers first. However, if your opponent chooses to attack first, then you should prepare a counter to his threat to protect your tower rather than ignore the threat and attack the other tower. For example, if your opponent sends out Archers against your left Arena Tower, ignoring the Archers and going for the right Arena Tower with your Prince card is a bad idea because the Archers will deal significant damage to your left Arena Tower while there is no guarantee that your Prince will make it to right Arena Tower as your opponent can simply place a Tombstone or Skeleton Army to stomp your Prince. And so, ignoring the threat and making a reckless play like that can cost you the battle right from turn one.

Focus on destroying one Arena Tower at a time

A big mistake I see new players often make is that they keep switching towers. You should focus on destroying the tower with the lowest HP first, and then move onto attacking the second tower while also playing defense if you’re in the lead (to let the clock run out).

Try to shift the momentum of the battle towards the direction of your healthiest Arena Tower

For example, say that your left Arena Tower has 1000 HP and your right Arena Tower has 2000 HP (and both your opponent’s Arena Towers are at full health). In this scenario, your opponent will try to constantly target your left Arena Tower since it is obviously weakened. However, it is still very possible for you to win even if you’re trailing. What you should do to make a comeback is try to force your opponent to attack right Arena Tower rather than your weakened left Tower. In order to do this, you should load up on Elixir, and play a little defense on your left Arena Tower (remember Arena Towers have Archers atop them to assist you on defense so take advantage of that) and then make the first move in attacking your opponent’s right Arena Tower with a good combo (i.e. Giant + Musketeer). This will make it difficult for your opponent to ignore the big threat and will have him shift his offense towards to protect his Arena Tower. With his offense shifted towards the right side, you can now focus on repeatedly placing pressure towards this side (preventing your opponent from spending Elixir to target your left side). This strategy will allow you to even the playing field, while going for a one Crown victory.

The most powerful attacks are attacks that are played in combinations

For example, a card such as the Giant is not much of a threat alone as he is a very slow troop. However, when combined with a ranged attacker such as the Archer or Musketeer card, it becomes a much bigger task to stop this threat. A Giant alone can be taken down by a 3 Elixir Minion card, but with the assistance of Archers, the Minions will not be able to take out the Giant (as he makes his way to your opponent’s tower). Thus, you should constantly try to load up on Elixir (and also win Elixir trade-offs) and attack in combinations!

There are many distinct ways of classifying a troop card and its specialties:

  • Ground troop = A troop that attacks from land.
  • Air troop = A troop that can fly and attack from above. Air troops can avoid being targeted by Ground troops that cannot target flying units (such as Bomber, Prince, Knight, Valkyrie, etc.).
  • Melee troop = A troop that fights mano a mano (hand-to-hand combat).
  • Range troop = A troop that can attack from a distance. Range troops such as Archers are able to attack from afar and so they are best utilized behind melee troops as the melee troops are able to shield your ranged attacker.

There are two types of damage inflicting cards

Cards that deal “point damage” (damage to a single troop or building) and cards that deal “area or splash damage” (damage to multiple troops or buildings). Point damage cards include Musketeer, Prince, Archer, Mini Pekka, etc. Area damage cards include Bomber, Valkyrie, Witch, Baby Dragon, Arrow, Fireball, etc. While it may sound like area-damaging cards are the better option, they are among the weakest cards in the game. Thus, these two types of cards have different roles. With the ability to damage multiple units, area damage cards are best utilized for defeating hordes or swarms of low HP troops such as Skeletons, Goblins, Barbarians, etc. While point-damaging cards tend to have the greatest DPS (Damage Per Second) among all cards and so they can best utilized for destroying high HP units. For example, a Mini Pekka can be used to quickly take down a Giant. While an area attacker like the Valkyrie will struggle to deal decent damage onto the Giant.

Thank you very much for reading! Please share this post with your friends If you find it helpful, that will help this blog a lot. Thank you my friends!

Elixir Advantage Trick

Hello my friends, in this guide, we are going to discuss about the Elixir Advantage, the most important factor in Clash Royale. I will also mention couples of things you are probably doing, both good and bad ways, help you be more conscious of your play style and make you a much better player.

As we all know, both players will receive the same amount of Elixir throughout the battle time and the Cards will go back and forth. It’s very hard to destroy a Tower in game since it’s the goal every player targets. The best time to destroy a Tower is obviously when it is not protected. One way is to simply bait a tower into being undefended then steal it (Goblin Barrel, Prince,…). However, If you can kill high Elixir cards, you will have lots of Elixir to use and your opponent just can’t afford to defend against them.

For example: Drop the Arrows card onto the Goblin Barrel, If you can do it right, your tower will just take the 30 damage from the Barrel and 0 damage from the Goblins. 3 Elixir for 4 Elixir, that’s a gain of 1 Elixir for you. Do it couples of times in the battle and you can earn a few free cards to knock down the enemy Towers (obviously). There are plenty of ways to spend your Elixir but as far as I can see, 5 Elixirs is enough to take down a tower (Balloon, Prince,…).

Yes! You got it! Make enough Elixir trades and you will have enough Elixir to destroy the Tower and win the battle. This is the most reliable way to win Battles in Clash Royale.

Proactive cards and Reactive Cards

Our Rules:

  1. Do not talk about Elixir Advantage Trick.
  2.  Do not talk about Elixir Advantage Trick.
  3. Never waste your Elixir, place a card when it reaches 10 Elixirs.
  4. Most of the time, you just need 5 Elixir difference to win the game.
  5. Play a mix of Reactive and Proactive cards.

What are Proactive cards?

Proactive Cards should be cards which can threaten the enemy Crown Towers and hard to made Elixir-positive trades. They are the cards you can play blind when it hits 10 Elixir. Don’t use any card which can’t deal a single damage to the Tower before it dies, that’s the rule #3 above.

  • Minions: Most of the time, they can’t deal much damage before getting killed. Don’t use them proactively.
  • Skeleton Army: Bad, easy to counter. Don’t waste 4 Elixir for this.
  • Baby Dragon: Not bad, it’s not easy to counter tho and can deal hundreds damage to the enemy Towers.
  • Other Good Proactive Cards: Knight, Giant, Valkyrie, Giant Skeleton, P.E.K.K.A,…

Use your Proactive cards when they don’t have any good Reactive Cards:

  • Prince, Balloon, Minion Horde, and Hog Rider would be nice.
  • If you know the opponent is holding a counter, don’t drop your Proactive card until that counter card is placed.
  • Don’t use your Prince If the opponent hasn’t used the Tombstone yet. 3 Tombstones – 3 Princes = -6 Elixir = losing!

What are Reactive cards?

They are cards which help you do positive Elixir trades in the battle. Don’t bother to drop the Arrows on 1 Elixir Skeleton but  a Minion Horde or the Skeleton Army.

  • The upside: Most of the time, they will swing the battle in your favor.
  • The downside: Sometimes the opponent cards are not easy to counter.

Reactive Cards and Matchups

Think clearly before using your reactive cards for the positive Elixir trades. Using 3 Elixir to deal with 2 Elixir is going to destroy your own Towers.

  • Arrows > Minion Horde/Skeleton Army/Goblin Barrel.
  • Arrows = Minions.
  • Arrows < Spear Goblins.

Matchups matter at close level:

  • Arrows can kill Spear Goblins, Minions but can’t kill Archers.
  • Rocket can destroy equal level Goblin Huts and Elixir Collectors.
  • A single Tombstone can kill equal level Hog Rider, Prince and Giant.
  • Freeze Spell can’t hit troops from the frozen Tombstone or freshly summoned troops.
  • Don’t use Skeleton Amy to counter Witch or Wizard because they can deal AoE damage.
  • A single Lightning Spell can kill equal level Witch, Musketeer and Wizards.

Trading HP Vs. Elixir

Never lose the sight of the end goal: Having more Crowns before the clock goes to 0:00. There is no difference between 1-0 and 3-0. One of the most common mistakes that I have seen is players focus on a defense instead of dealing damage to the enemy Towers, especially at the end of the battle. Your Crown Towers have decent HP and they can take care of themselves in an attack. Don’t Arrow a pack of 3 Goblins or Minions.

A Tower with 1 HP wins the game as much as a Tower with 1000 HP. Sometimes, just let your Tower take hundreds damage and spend those Elixirs on a Proactive cards, which can finish off the enemy Tower. Using the Prince in the opposite lane you are getting attacked is a good common trick. If both players have all Towers: Just keep defending because you still have lots of time to finish off the enemy Towers.

A big thanks to The_RumHam for sharing these tips.

I hope you could learn something new after reading this guide. Don’t forget to share this guide with your friends If you like it, I will really appreciate it, that will help this blog a lot!

How to push to Arena 6 at level 6

In this guide, I am going to show you the easiest way to push to Arena 6. The deck in this guide has a very high win-rate against most other Decks that I have ever meet. Also, in this guide, I will show you how to easily counter those Decks. This deck was given by JesusSlark from Thailand. Currently he is at rank 13th in Thailand and he just level 6.

And this is my Deck:

General Plan

I usually start the game with either a Cannon or the Spear Goblins card (drop the card when your Elixir bar hits 10. By doing this, your opponent will always drop high Elixir cards first. You can easily counter most cards with the elixir advantage. Just don’t rush the game, slowly whittle his towers and you can win most the games.

Matchups

Balloon + Freeze: This deck building is extremely strong against Balloon + Freeze combo. I can’t remember the last time when I lost my towers because of this combo. Just make sure your Cannon is placed at the middle and the enemy Balloon will always get distracted to by it. Then, drop the Spear Goblins or the Wizard to quickly take the Balloon down. I always drop the Spear Goblins and Wizard first to bait out the Free Spell. Once the opponent drops the Freeze Spell, you cna use the Minion Horde card and start playing counter attack. Most of the time, the opponent use 9 Elixirs for nothing and you can easily get a free tower. Also, If you don’t have the Cannon to distract the Balloon, you should drop your Minion Horde card as soon as possible otherwise your Tower will be completely toasted. Don’t worry If the attacker uses the Arrows, your Minions always can deal lots of damage before they die and your Goblins/Wizard can finish the job.

Hut Deck Building: This is another popular deck building that we can see everyday. Firstly, always remember to drop your cannon at the middle then drop the Knight or the Spear Goblins on the side which is being pushed. Wait until the opponent drops 2 Huts (Barbarian Hut and Goblin Hut for example) then use the Lightning Spell on them (of course don’t target the King’s Tower unless you want to take additional damage). With Arrow, Barbarians, Wizard and Minion Horde, you can easily defend your Towers against hordes of enemy troops. Also, remember to spread your troops out so they will not be killed by 1 AOE Spell. Keep lightning their Towers and repeat that, you will have an easy win with the Lightning Spell.

Giant/Golem/P.E.K.K.A/Giant Skeleton Deck: This type of deck is also very easy to counter. Drop your Cannon at the middle of the side where the tanky units is targeting. The tanky troop will always get followed by high damage units such as the Witch/Musketeer/Bomber, right? Simply drop your Knight/Barbarians on the top of them, then, use Minion Horde or Spear Goblins to deal with the tanker. After this, you can easily launch your counter attack.

X-Bow: Even the X-Bow is pretty gotten nerf after the update but there are still lots of players using it. As I can see, a common type of this deck is using 1 defensing building such as the Inferno Tower or the Tombstone to protect the X-Bow. They usually place the Inferno Tower at starting so you can simply drop the Lightning Spell to take it off. I always do that with the Inferno because I don’t know If they have the X-Bow or not. Then, deploy the Barbarians/Knight and followed by a high damage ranged troop such as Spear Goblins/Wizard/Minions. Now that you know the opponent has the X-Bow. You always should stay high on Elixir to counter the X-Bow. Once the opponent drops the X-Bow, save 1 Lightning Spell to counter it. A level 2 Lightning Spell can leave the X-Bow with about 10-25% HP, after that, you can use your Knight to distract the X-Bow and use your Spear Goblins or the Minion Horde to take it down.
Another way to deal with the X-Bow is to drop Barbarians followed up with Wizards or Minion Horde.

Freeze+Hog/Prince Decks: Drop the Cannon at first once again, it is one of the game winning cards. Drop it in the middle and the enemy Hog and Prince come charging right for it. You can easily counter them by dropping the Spear Goblins/Knight to help your Cannon take them down faster. He just wasted 8 Elixirs for just a 3 Elixir Cannon. Such a nice trade!

Other Tips

  • At starting, If the opponent doesn’t drop any card when the Elixir hits 10, you should drop Spear Goblins near the bridge, don’t drop them behind the King’s Tower. By dropping them near the bridge, they can deal at least 300 damage to the enemy Tower (yes, 300 damage for only 2 Elixir). Sometimes, the opponent panics and drops a high Elixir card. You can easily counter it and take the advantage of this.
  • Always use the Lightning Spell when they drop a high Elixir card near their Towers (Inferno Tower, Witch, Musketeer, Huts, X-Bows, Mortar,…) and trade 1 for 1, also deal 358 damage to another tower.
  • Don’t place any card behind your Tower except for the Knight/Goblins unless you know the opponent doesn’t have Fireball/Lightning or the Rocket, or he just used it in the previous turn.
  • Always spread out your troops when defending so that they don’t get crushed by an AOE Spell/Troop.
  • When the opponent uses Arrows and drop some Spear Goblins/Barbarians, after that, quickly drop the Minion Horde down near the bridge.

Thank you very much for reading! Hope you can push to Arena 6 as soon as possible with this Deck!

Deck Building Guide

Clash Royale Deck Building Guide

Synergy above all

Everytime we talk about deck building in this game, synergy is the most remarkable ingredient. We all want every card to work alongside each othere, right?
Unfortunately If you are using Epic cards solely, they can’t be an excellent Deck. Building a deck is not about rariry. It is about Synergy!

Defense is as important as offense

Of course you need offense to destroy the Crown Tower and win the battle but If you don’t know how to defend your Tower, you can’t win any battle. Your Deck needs a balance of offense and defense to be useful in any situation.

The Balance of Point and Splash Damage Cards

As we can see, there are 2 types of damage-inflicting cards in Clash Royale.

  • Point damage: Cards that deal damage to only one enemy (Musketeer, Barbarian,…). Because they can only target 1 unit at a time, they are the highest damage-inflicting units in game. They are indispensable in order to take down high HP troops (Tankers).
  • Splash damage: Cards that deal damage to multiple units (Witch, Baby Dragon,…). Because they have the advantage of dealing damage to multiple opposing units, they are the lowest damage-inflicting units in game. These cards are necessary for dealing with hordes of low HP units.

Melee and Range Units

We need a balance of ranged and melee troops on your Deck. Ranged troops usually have high damage per second but low HP. It is very important to combine them with melee troops. We need to use the melee troops as the meat-shield for high damage ranged troops. Having too many melee troops is such a bad idea because that will make them very susceptible to splash damage. You can see how easy it is for a Valkyrie to take down all melee troops nearby, right?

Average Elixir Cost

The Average Elixir Cost is very important. You don’t want to wait 10 seconds in order to drop Card, right?
The better a Card is, the more Elixir it costs. Your Deck should have these ingredients to be a well balanced Deck:

‘Average Elixir Cost’ should be between 3.7 and 4.5

After weeks, I have found it’s a good idea to have the Average that is between 3.7 and 4.5. If your AEC is higher than this, you are always struggling to constantly deploy your cards (for defending of course). If your AEC is below 3.7, although you can deploy many cards quickly but they are all low HP troops and can be wiped out by splash-damaging threats quickly.

Having at least 2 point damage-inflicting Cards

Although groups of low HP units can quickly destroy high HP cards and buildings, they can be eradicated by splash damaging Cards. Because of that, you always need to have at least 2 point damage-inflicting Cards as the backup.

Here are some examples:

  • Musketeer (range)
  • Prince (melee)
  • Spear Goblins (range)
  • Knight (melee)
  • Archers (range)
  • P.E.K.K.A or Mini P.E.K.K.A (melee)
  • Minions/Minion Horde (flying range)
  • Barbarians (melee)
  • Cannon
  • Tesla
  • X-bow
  • Inferno Tower

Having at least 3 splash damage-inflicting Cards

Splash damage-inflicting Cards are important for dealing with large hordes of troops (most players like this strategy):

  • Giant Skeleton
  • Bomb Tower
  • Bomber
  • Rocket
  • Baby Dragon
  • Arrows
  • Witch
  • Fireball
  • Valkyrie
  • Zap
  • Wizard
  • Mortar
  • Lightning

Having at least 2 high HP cards

High HP cards can be either a troop or defense with at least 1000 HP. They are necessary to take damage and protect backup troops:

  1. X-Bow
  2. Golem
  3. Prince
  4. P.E.K.K.A
  5. Barbarian Hut
  6. Goblin Hut
  7. Giant Skeleton
  8. Cannon
  9. Bomb Tower
  10. Inferno Tower
  11. Giant

Having at least 2 air-targeting Cards

If you are at a high level Arena, you usually can face aerial attackers. Most new players don’t have a solution for dealing with aerial troops. Make sure that there are at least 2 air-targeting Cards on your Desk:

  • Tesla
  • Inferno Tower
  • Baby Dragon
  • Wizard
  • Musketeer
  • Archers
  • Minions / Minion Horde
  • Spear Goblins
  • Witch
  • X-Bow

Having at least 1 Spell Card that deals splash damage

Yes, splash damaging troops can deal with a large group of troops but their coverage, range and movement speed are limited. It is extremely important to have a splash-damaging Spell Card such as Lightning, Arrows, Rocket, Fireball or Zap.

For example, your Bomber can deal splash damage from behind your Giant but If the opponent deploys a Goblin Barrels onto your Weakened Tower, a card like Arrows is very important in this situation to quickly remove those Goblins.

Damage-inflicting spell cards are also very useful for taking down weakened Towers.

Having at least 1 defensive structure Card

Tombstone, Goblin Hut, Hidden Tesla, Bomb Tower, Cannon, X-Bow and Mortar are excellent for slowing down the speed of the game, give you more time to load up Elixir.

Having at least 1 defensive building to protect your Towers is important because you only need to destroy 1 enemy Crown Tower to win the Battle.

Clash Royale Chests

Definitely Chests are the most wanted item in Clash Royale since you can get all cards by opening them and of course, currently you can’t buy anything except Chests LOL.

Summary

  • At the moment, there are 5 types of Chests in game: Wooden Chest, Silver Chest, Golden Chest, Magical Chest and Crown Chest.
  • You always receive a Silver Chest after finishing a battle or the the Golden Chest if you don’t lose any crown, the Magical Chest is very rare.
  • The higher your Arena is, the more cards you can get after opening Chest.
  • You can just get 1 Crown Chest per day by earning 10 crowns before the timer ends.
  • Only Free Chest and Crown Chest contain Gems.

Clash Royale Chests in Shop

Clash Royale Chests

Chests Contains Obtained by Unlocking Time
Wooden Chest Clash RoyaleWooden Chest Gold + 4 Cards Every 4 hours and can be stacked 15 seconds
Crown Chest Clash RoyaleCrown Chest Gold + Cards Winning 10 Crowns Instant
Silver Chest Clash RoyaleSilver Chest Gold + 4 Cards Buying in Shop or Winning a Match 3 hours
Golden Chest Clash RoyaleGolden Chest Gold + 14 Cards (At least 1 Rare) Buying in Shop or Winning a Match 8 hours
Wooden Chest Clash RoyaleMagical Chest Gold + 41 Cards (At least 1 Epic and 8 Rares) Buying in Shop or Winning a Match 12 hours

Excepting Wooden Chest and Crown Chest, currently you just can have 4 chests in total.

Clash Royale Battle – Basic Rules

In Summary,  If you win a battle, you earn trophies and you can go up to unlock new Arenas. Arenas unlocks new Cards.

The Battle in Clash Royale

  • Players square off against live competition on tiny maps dotted by six buildings; three for each player: two Arena Towers and one King’s Tower.
  • The object of the game is to destroy the other player’s King’s Tower (middle building) while protecting your own.
  • You’ll do this by deploying troops from a hand of cards (drawn from a Battle Deck that you’ve built) anywhere within an allowable area on the field.
  • Each card requires a certain amount of Elixir to deploy, but your Elixir regenerates quickly, so you’re only ever moments away from deploying your next troop or spell.
  • More cards are collected by unlocking chests won in battle or bought in the shop, which in turn will unlock new cards that you can add to your Battle Deck and level up the cards you already have.
  • On the event of taking down an Arena Tower, a new region on the opponent’s side is opened, available for you to deploy your Troop Cards to have an upper hand on the opponent.

Clash Royale Battle Deck

The Battle Deck

  • Your battle deck is the rotation of cards you wish to have in battle.
  • To change these you must tap the card you wish to add into your battle deck and tap use then tap the card that you would like remove from your battle deck.
  • Next to the Battle Deck heading it will display the average elixir cost of all your troops, sometimes this can come in handy when deciding if your deck is suitable. For example a deck with an average of 3.5 elixir that is semi-powerful is better than a deck with an average of 4.7 that is slightly more powerful as you will not be able to deploy troops as often to counter defences and proceed with your offensive strategy.
  • The battle deck consists of only 8 cards, so you want all your cards to be ones that you will be using, otherwise that is a waste of a valuable cardspace.

Winning the Battle in Clash Royale

  • If you destroy the other player’s King’s Tower, you win immediately.
  • If no one is able to take down the King’s Tower within the first 2 minutes, you and your opponent’s Elixir regeneration speed is doubled.
  • If no one is able to take down the King’s Tower or have more towers destroyed than the opponent within the first 3 minutes, sudden death is enabled, a mode in which the next player to destroy a tower wins.
  • If that is not able to happen within another minute, the game will end as a tie and no one will receive or lose any of their Trophies.

Best Beginner Deck (Arena 1 to 5)

After the global launch I’ve put together lots of different decks with Training Camp and Goblin Stadium cards, and this is the best deck I have come up with. I remember how hard it was to decide on a deck starting out with the game, and hopefully this guide will be useful to new players. I’ve used the same format as my Arena 4 – 6 guide, take a look at that if you’re pushing arena 5 or 6.

This deck is built up around countering and taking advantage of your opponent’s mistake. From arena 1 all the way up to arena 5, most players make lots of mistakes. The most common mistake I saw as I was testing out decks, was opponents playing too offensively. This deck has lots of good defensive troops to stop your opponents push and then take out crown their tower in a nice counter-attack. It’s also a low elixir cost deck at 3.6, a good thing for new players as well.

The cards.

Prince-Epic-Card-Clash-Royale Baby-Dragon-Epic-Card-Clash-Royale Archers-Epic-Card-Clash-Royale Knight-Common-Card-Clash-Royale
Fireball-Rare-Card-Clash-Royale Skeleton-Army-Epic-Card-Clash-Royale Valkyrie-Rare-Card-Clash-Royale Spear-Goblins-Common-Card-Clash-Royale

Lightning and baby dragon are the only two epic cards in this deck. The rest of the cards are mostly lower level cards, so they are not that hard to get. Most cards can also be replaced while without effecting the deck too much.

Archers.
Archers are one of the most underrated cards in Clash Royale. They are great in defence dealing good damage to both air and ground troops. They don’t die to arrows or the same level and will deal a lot of damage to enemy crown towers if protected.

Prince.
Prince is and has always been an awesome card. It’s the first real tower killing card most players get access to, and you can use this card all the way up to Legendary Arena. What is nice with the Prince is that you can even defend with it in emergencies. Usually you’ll use it to kill one of their crown towers when they are low on elixir however.

Baby Dragon.
The Baby Dragon is one of my favourite cards and is an important part of this deck as well. The reason this card is awesome is because it is both flying and deals splash damage, which makes it awesome at taking out enemy barbarians and minion hordes. It can also do decent damage hitting the enemy tower solo.

Valkyrie.
Valkyrie is not a card that is used a lot, but especially for beginning players she is a very good card to have in your deck. Bomber would be a good alternative, but the Bomber is much harder to play. Valkyrie is really hard to misplay, just use her to counter enemy ground troops and you will do fine. She can also be used to tank while your archers and spear goblins are hiding behind her.

Fireball.
This deck doesn’t use arrows, so a fireball is really needed then. You use this to take out Minion Horde, Barbarians Goblin Barrel and other annoying cards. Lets say they drop a giant, they will often follow up with a Witch, Bomber and Archers. Your fireball will take out all the troops behind the Giant and they are the ones that cause the most damage.

Skeleton Army.
Skeleton Army is in here to deal with Prince and Hog Rider mainly. However, it can also be used to swarm other troops like Pekka, Mini Pekka and the Golem.

Knight.
The Knight is in the deck for defending primarily. It will take out a Wizard, Musketeer and Witch one on one and still survive, which will give you a nice elixir advantage. The Wizard and Witch costs 5 elixir to the Knights 3 elixir, a 2 elixir advantage! The Knight can also distract a Baby Dragon while your tower takes it out, and will even take out a Giant Skeleton.

Spear Goblins.
These guys are also in most of my decks. They are cheap and decent at taking out enemy flying units. I also often use them to distract enemy tower killing troops until I can deal with them.

Card replacements.

Here are my suggestions for replacements. Most new players don’t have all the cards yet, so as long as you don’t replace more than 2-3 cards the rest of the guide and play style should be quite similar. I’ve also used cards from higher arenas in the replacements, as I’m sure many player reading this guide are higher than arena 1 already.

  • Archers can be replaced with Minions.
  • Prince can be replaced by Hog Rider or Giant.
  • Baby Dragon can be replaced by Witch or Wizard.
  • Skeleton Army can be replaced by Tombstone or Tesla.
  • Spear Goblins can be replaced by Minions.
  • Fireball can be replaced by Arrows or Zap.
  • Knight can be replaced by Minions.
  • Valkyrie has a great replacement in the Bomber.

Opening. (0:00 – 0:30)

spear-opening

My preferred option is to open with Spear Goblins behind one of my towers. Spear Goblins are cheap at only two elixir, and I will have almost all my elixir left to react to whatever my opponent is opening with. I place them behind my towers so that I can place tank units, like Knight, Valkyrie or Baby Dragon, in fromt of them before they reach the bridge.

opening-baby

If I don’t have Spear Goblins in my opening hand I will go for the Baby Dragon. The Baby Dragon is moving slowly and does well on it’s own even without support. It is very hard to counter the baby dragon and come out on top. If there are no other threats to deal with I will often place Archers or Spear Goblins behind it once i reaches the bridge.

knight-opening

My third choice of opening would be the Knight. The knight does well against most troops alone and can also do some damage to the enemy crown tower if he is not stopped. The combo with Archers or Spear Goblins behind him work really well.

archer-opening

The last choice of opening would be archers, they don’t do too well against enemy towers alone, but if I can get a Knight, Baby Dragon or Valkyrie in front of them before they reach the bridge they are great. Versus most troops the Archers also do well alone, it’s hard to kill them efficiently and gain an elixir advantage.

Midgame. (00:30 – 2:00)

This decks is built around defending efficiently, and then use your elixir advantage to counter-attack. When you play, be patient and don’t overcommit on an attacks. That is what your opponent is going to do, and you are going to sit back and kill his troops in front of your towers. Then, once you have your opponent at an elixir disadvantage, attack!

prince-archer-combo

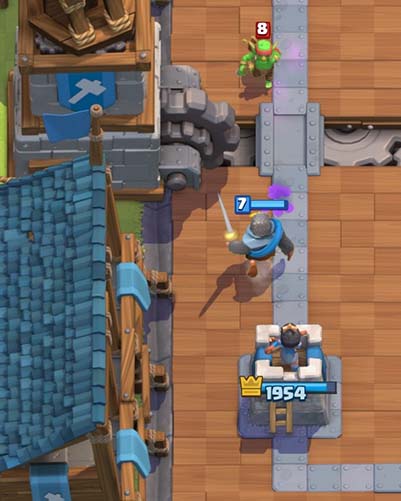
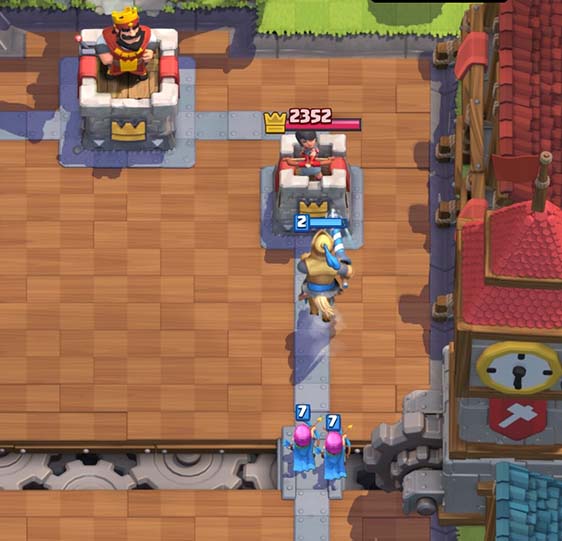
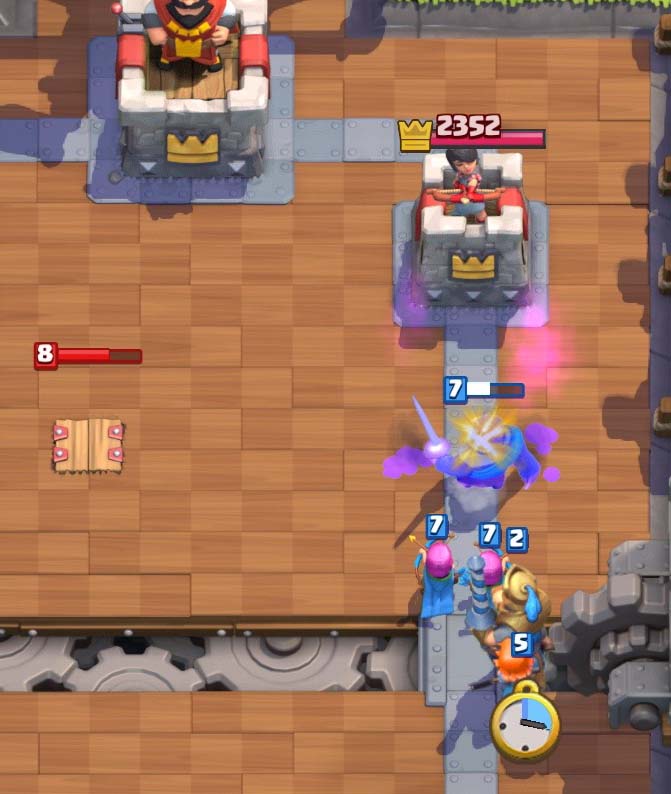
The Prince with Archers behind him works really well. The Archers can both do good damage to the towers and take out any defensive troops your opponent might place. In this situation he placed Minions to defend, and my Archers took them out.

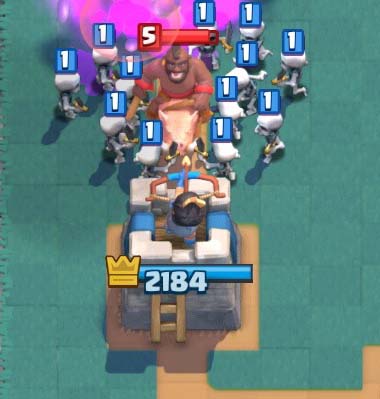
Especially in lower arenas players keep attacking and attacking without letting their elixir reset. Don’t do this, it’s a big mistake. Anyways, this means that you often will have enough elixir to counter-attack in the other lane while still holding back your opponent’s attack.

prince-push-other-lane

In the screenshot above you can see such a counter attack. I don’t need all my elixir to defend so I can counter-attack in the other lane while my opponent is out of elixir and is unable to defend it. This Prince can easily take out the rest of the tower as my opponent will spent too long time waiting for elixir before he can defend.

Endgame. (2:00 – 3:00)

How the endgame goes depends on how much damage you have managed to cause in the midgame. Hopefully you have brought one of the enemy towers down to 600 hp or lower. If you have, you should focus almost all of your effort in defending at this point, that means no pushing with the Prince unless you’re 100% sure your opponent is out of elixir and unable to defend.

Whenever you’ve successfully repelled an enemy attack, try to get the enemy tower down to where your fireball or lightning can kill it in one hit. Then you can just keep defending and launch a fireball or lighting at the last second of normal time to take out the tower.

endgame-clash-royale-update

If you on the other hand have a lot of hit points left on the enemy tower, or even worse, he has killed one of yours already, your gameplan changes a lot. In this case you have to take more risks. Elixir is increasing at double speed so players get more stressed and often miss defending the lane they are not currently focusing on, if you’re lucky your Prince can take out a crown tower solo without your opponent noticing.

A general rule is that more behind you are in the game, the bigger risks you should take. In same cases you will ignore defending your tower or castle completely if you believe there is a chance you can take out the enemy tower before your tower is dead. This is especially true during overtime, the first one to kill a tower wins the game then after all.

Offense tactics.

Here I will discuss some common situation where this deck really shines and gives you a nice elixir advantage if you play correctly.

Counter attack.

defending-hog-rider

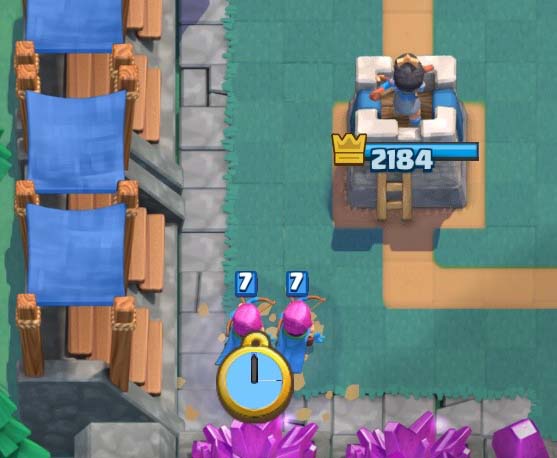
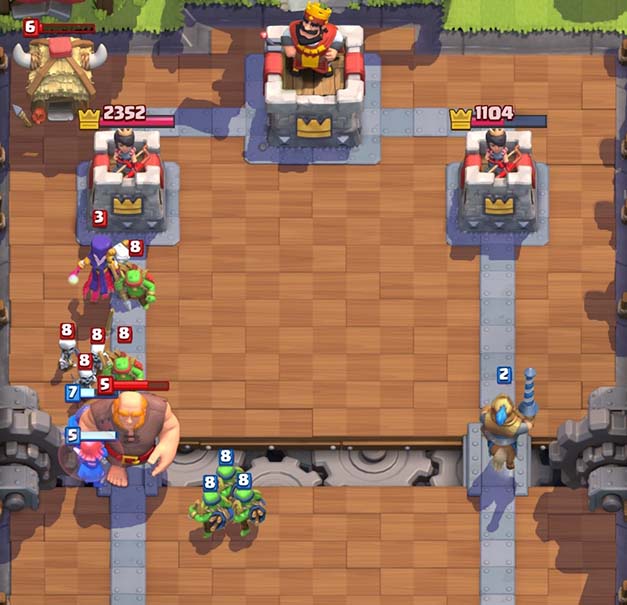
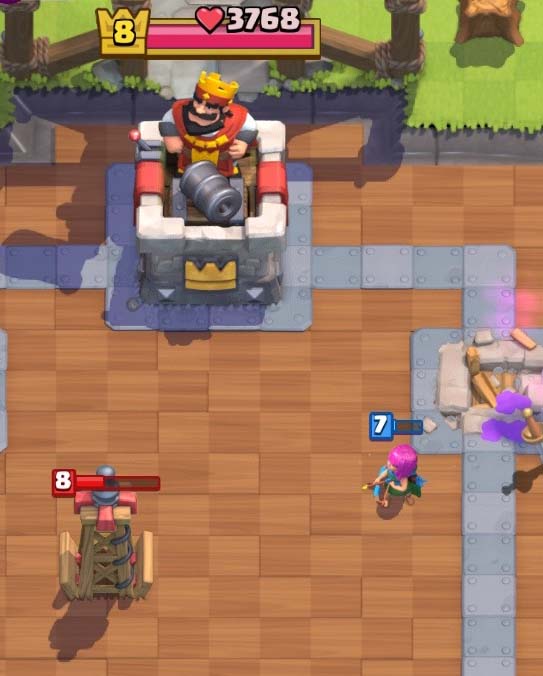
Here my Archers first take out the enemy Hog Rider in defence. If you use Archers to defend against Hog Rider it will only be able to hit the tower two times.

counter-attack-one

Once the Archers reach the bridge I place my Knight in front of them. I also place my Prince behind the Knight so it will push the Knight forward to tank the damage for everyone else. The Valkyrie also joins in for the big push.

counter-attack-two

My opponent tries defending with Minions and Archers, but the tower is still taken out with one of my Archers surviving. My opponent was too low on elixir to defend the push and also misplaced his Tesla.

Fireball to kill Swarms.

fireball-minionhord-elixir-advantage

If your opponent plays Minion Horde, Barbarians or any combination of weaker troops together Fireball gives you a real nice elixir advantage. Both Minion Horde and Barbarians cost 5 elixir to play, and taking them of with Fireball will give you a one elixir advantage. Barbarians might still survive depending on level, but it will leave them low enough for your tower to take them out without taking damage.

If you kill two cards worth of troops with your Fireball you can get an even larger elixir advantage. Often I’m able to kill 8 elixir worth of troops like Witch and Archers with one Fireball. This is huge, a 4 elixir advantage like this enables you to do tons of damage to their towers.

Defence tactics.

Here I’ll describe some common situations you will face with this deck, and how to defend them. Please let me know by leaving a comment if there are any other situations you’d like me to discuss.

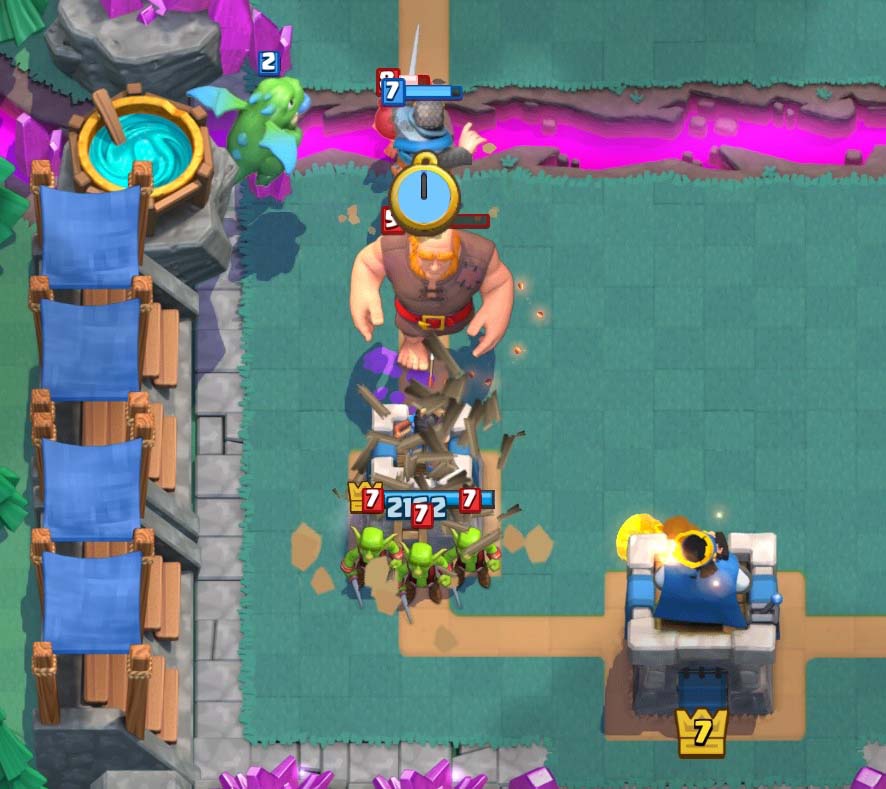
Defending the Giant push.

I noticed that pushing with Giant in front is really popular in the lower arenas. I guess that is because most players really struggle stopping this push. The Giant push is placing a Giant at the far back of your towers and place weaker DPS troops behind it once it gets to the bridge. Then the Giant will tank the damage while the DPS troops will deal the damage.

incoming-giant

It can be hard to stop this push if you don’t know how to do it, as you will often end up in a situation where all your troops are hitting the Giant while the enemy troops are shooting at your troops without taking damage.

What you ideally want to do is to take out the troops behind the Giant first, and then deal with the Giant. Fireball is a great spell for this, it will often take out all the troops behind the Giant. Lightning is another option of they use troops like Witch or Wizard behind the Giant.

knight-dragon-placed-behind-giant

If you don’t have spells ready or the right situation for them, you have to use regular troops. Depending on what troops they use behind their Giant you want some or all of your troops behind the Giant to deal with them. In the image above you see that the Knight and Baby Dragon is placed behind the enemy Giant to deal with the troops there. Here I also had Fireball ready, but I had to use that to deal with the Goblin Barrel.

Defending against Prince and Hog Rider.

hog-rider-vs-swarm

Hog Rider is not common at lower levels, but you often have to deal with the Prince. If you don’t stop the Prince he will deal a ton of damage to your tower. The main card for dealing with Prince and Hog Rider is Skeleton Army. Playing this as soon as you see the Hog Rider approaching will take him out without any hits landing on your tower. Dealing with the Prince you can play it even later, as long as it lands before he hits your tower the skeletons will swarm around him and take him out.

defending-hog-rider

If you don’t have Skeleton Army ready you are in a bit of trouble. Spear Goblins or Archers can do the job though, Archers will take out a Hog Rider before it can land more than two hits to your tower.

Comeback.

If you do some errors and get behind from the start of the game, don’t give up. This deck gives you a good chance at a comeback if your opponent makes errors, and he will for sure. Players makes error all the time, and the winner is usually the player who makes the least amount of errors.

Conclusion.

This is a very active and fun deck to play, and from my experience it does really well against all other decks. I did not find any specific deck type I had a big problem with.

It is also a great deck to learn the game with in my opinion. You learn which troops counter which and how to use your elixir advantage to as much damage as possible to the enemy towers.